SQL Server Migration in More Complex Cases

Typically, a SQL Server Migration is performed fully automated via Data Migration Assistant, however, in the cases where that’s not possible, a more manual approach to migration is required.
With SQL Server 2012 having reached end of extended life last year, many are looking to migrate to newer SQL Server versions. Usually, a SQL Server Migration is simple, an almost fully automated process via Data Migration Assistant, but there are cases where a direct migration is not possible. These cases necessitate manual backups and restore of the databases, logins and other configuration. In this blog post, we’ll walk you through the steps necessary to perform this sort of manual migration to preserve all databases and logins. This will result in a migration that enables you to simply just update your connection strings to complete the migration process.
Two Approaches to One Problem
When it comes to performing a manual backup and restore of SQL Server databases there are two ways to go about it: either by using Transact-SQL, or by using PowerShell Cmdlets. For backups, neither approach is better or worse, however when it comes to restoring the databases the PowerShell avenue offers some significant conveniences. Namely, the modern SqlServer PowerShell module provides automatic relocation of the SQL Server Database physical files upon restore. Unfortunately, the SQLPS module that ships with SQL Server to this date is an older, legacy version of the module that lacks these convenience features. To get the modern SqlServer PowerShell module, it can simply be installed through running the following line in PowerShell. Specifying the AllowClobber flag is necessary since there are existing commands from the legacy SQLPS module installed alongside SQL Server.
Install-Module -Name SqlServer -AllowClobber
Using PowerShell to Make the Backups
If you have a large number of databases to restore, it can be much easier to use PowerShell to facilitate the backups of the databases. Here we’ve provided an example script that backs up the databases of all instances resident on the machine it is being executed on.
Import-Module -Name SqlServer

$BackupLocation = "C:\SQL Server Backups\"
If (!(Test-Path $BackupLocation)) {
    New-Item -Path $BackupLocation -Type "directory" > $null
}

$Instances = Get-ChildItem "SQLSERVER:\SQL\$($env:COMPUTERNAME)"
Foreach ($Instance in $Instances) {
    $InstanceBackupLocation = $BackupLocation + $Instance.DisplayName + "\"
    If (!(Test-Path $InstanceBackupLocation)) {
        New-Item -Path $InstanceBackupLocation -Type "directory" > $null
    }
    $Databases = Get-ChildItem "SQLSERVER:\SQL\$($env:COMPUTERNAME)\$($Instance.DisplayName)\Databases"
    Foreach ($Database in $Databases) {
        Write-Host ("Backing up database SQLSERVER:\SQL\$($env:COMPUTERNAME)\$($Instance.DisplayName)\Databases\$($Database.Name)...")
        Backup-SqlDatabase -Database $Database.Name -BackupFile ($InstanceBackupLocation + $Database.Name + ".bak")
    }
}
Using PowerShell to Restore the Backups
Restoring the databases can also be achieved via PowerShell. The Restore-SqlDatabase Cmdlet from the SqlServer module allows you to use the AutoRelocateFile flag, which handles the entirety of relocating physical files for you, unlike with Transact-SQL or the legacy SQLPS module where you’d need to specify the locations to relocate the physical files to yourself.
Import-Module -Name SqlServer

$BackupLocation = "C:\SQL Server Backups\"
$BackupFiles = Get-ChildItem -File -Recurse -Path $BackupLocation

Foreach ($File in $BackupFiles) {
  Restore-SqlDatabase -AutoRelocateFile -BackupFile $File.FullName -Database ($File.Name.Replace(".bak",""))
}
Moving Logins – The Manual Way
After migration of the databases from the source SQL Server instance to the destination SQL Server Instance, the logins must be moved. It may at first be tempting just to create new logins with the same name and password as logins on the source SQL Server instance, but if you go this route you will quickly run in to all manner of esoteric error messages when trying to reconfigure user mappings and other login associated configurations on the databases.
This is due to the fact that SQL Server users are attached to the database, whereas SQL Server logins are not. SQL Server uses an internal value called the Security Identifier (SID) to associate logins with database users. When you create a new login it will have a different SID and so upon attempting to configure user mappings on the database, SQL Server tries – and fails – to create new database users. This state of having users without the associated logins is known as “Orphaned Users”. If you try searching online for how to fix this you’ll find many suggestions ranging from deleting the users associated with the database just to recreate them all again, to running some Transact-SQL commands to reattach the orphaned user to a new login (unfortunately this is the only option when using Windows Authentication with local users).
Thankfully, if you use SQL Server Logins, there is a much easier way. You can query an internal table within SQL Server to get the hashed password and SID of SQL Server logins and then use these values to create new logins whilst explicitly specifying a hashed password and SID. This means you can migrate logins without needing to join orphaned users to new logins, and allows you to replicate the way things were on the old instance in an exact fashion. You can then just alter your connection strings to connect applications to the new databases.
You can use a query like the following to get a list of all logins, their SID, password hash, default database, and default language.
SELECT
    p.name,
    p.sid,
    loginproperty(p.name,'PasswordHash') as password_hash,
    p.default_database_name,
    p.default_language_name
FROM
    sys.server_principals p
WHERE
    p.type IN ('S','G','U');
This query will yield something looking like the following:
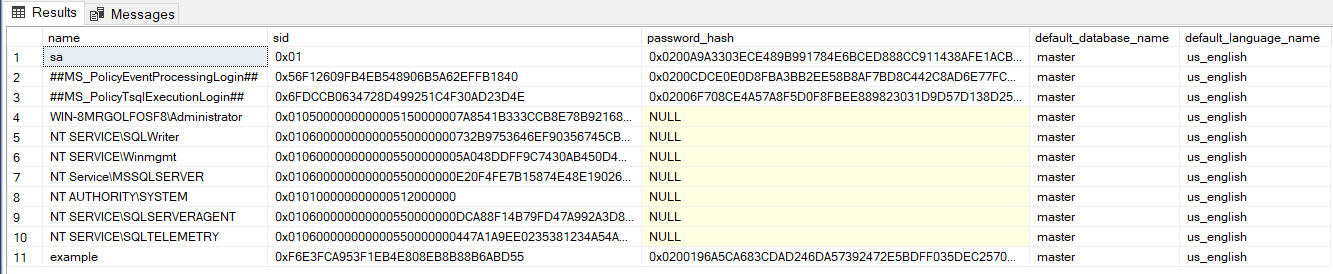
Note: The above is example data from a temporary instance. The password hash value is sensitive and should not be shared under normal circumstances.
Once you have the results of this query, you can start to construct the necessary Transact-SQL queries to create the new logins on the destination SQL Server.
CREATE LOGIN
    example
WITH
    PASSWORD = 0x0200196A5CA683CDAD246DA57392472E5BDFF035DEC2570C8A62A23A196E99B27495C44EEC3BDDB6581DFBF0F49A1C0E8EFF3AA80AC16DED1602DDE1E01FD7029ED818DBC3BF HASHED,
    SID = 0xF6E3FCA953F1EB4E808EB8B88B6ABD55,
    DEFAULT_DATABASE = [master],
    DEFAULT_LANGUAGE = [us_english];
Once all this has been done, you will have migrated SQL Server in such a way that all databases and logins, and the relation between database users and logins, is preserved.