Docker in Docker ?
Kaniko allows us to build and publish our docker images a docker repository safely.
We use all manner of tools here at Punk Security, this is another blog for our tooling series.
In our blog post we are going to look at how we can use Kaniko to build Docker images from with in Docker and integrate it in to a Continuous Delivery (CD) part of the CI/CD pipeline.
What is Kaniko
Kaniko is an opensource project, built and maintained by Google. It allows the building of images from Dockerfiles without privileged access or insecure access to the docker deamon.
Kaniko is a standard docker image that takes in three arguments:
- Dockerfile,
- Build context
- Docker registry, to which it should push the final image.
To better understand how Kaniko works we need to understand what a Dockerfile stage and command are.
Stage
Docker stages enables you to use multiple FROM statements. Each FROM instruction can use a different image base, allowing you to build multiple images from as single Dockerfile. Multi-stages build allow you to copy artifacts from one stage to another and optimise the Dockerfile, while keeping them easy to read and maintain.
Below is a simple example of a multi-stage Dockerfile
# syntax=docker/dockerfile:1
FROM ubuntu:20.04 as Docker1
RUN apt update && apt install python3 -y
CMD ["echo", "Hello Punks of the world! from Ubuntu"]

FROM alpine:latest as Docker2
RUN apk update && apk --no-cache add python3
CMD ["echo", "Hello Punks of the world! from Alpine"]
In the example above it would create two images;
- Docker1 as a Ubuntu image
- Docker2 as a Alpine image
Command
Under each stage you will have a series of instructions to build the new image, such as RUN, CMD, ENV, ADD, COPY, USER to name a few. The Docker daemon runs the instructions in the Dockerfile sequentially, then committing the result of each instruction before outputting your new image. You can use these commands to install and configure applications, or switch user context.
In the example below we will run apt update, then install python3 and configure the container to output “Hello Punks of the world” when run.
FROM ubuntu:20.04 as Docker1
RUN apt update && apt install python3
CMD ["echo", "Hello Punks of the world!"]
How does Kaniko work
Kaniko works on loops of the stages and commands as shown below;
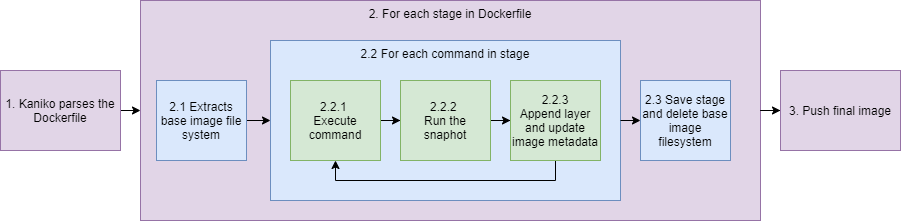
Step
- Kaniko will parses the DockerFile, for processing
- Kaniko will loops on the stages configured in the Dockerfile
- Kaniko extracts the base-image file system (FROM image named in the DockerFile) to root of the executor.
- Kaniko will now loop until all the commands in the stage have been completed
- Kaniko will then run the command
- Kaniko takes a snapshot of the file system after each command. The snapshot is created in user-space by walking the filesystem and comparing it to the prior state that was stored in memory.
- Kaniko will then append any of these changes as a new layer to the base image, and makes any relevant changes to image metadata.
- Kaniko will save the stage, then delete the image filesystem ready for the next stage.
- Once Kaniko has finished executing every stage and command in the Dockerfile, it will pushes the newly built image to the desired registry.
This means that Kaniko can be run as a docker container from within a docker container, and doesn’t need access to the hosts docker service or sock … Docker Inception 😊.
Pipeline
So lets look at how we can use Kaniko in a few easy examples;
Example Repo
Dockerfile
FROM ubuntu:20.04 as Docker1
RUN apt update && apt install python3
CMD ["echo", "Hello Punks of the world!"]
config.json
{
	"auths": {
		"HARBOR": {
			"auth": "BASE64-CREDS"
		}
	}
}
Jenkins
pipeline {
  agent {
    docker {
      image 'gcr.io/kaniko-project/executor:debug'
      args '--entrypoint="" -u 0'
    }
  }
  stages {
    stage('Kaniko Build') {
      steps {
        script{
          $repository = 'harbor.example.com'
          $project = 'project'
          $imageName = 'example-image'
          $version = '1.0'

          sh "/kaniko/executor \
            --dockerfile dockerfile \
            --destination $repository/$project/$imageName:$version"
        }
      }
    }
  }
}
GitHub
jobs:
  build:
    steps:
      - uses: actions/checkout@v2
      - uses: docker/metadata-action@v3
        id: metadata
        with:
          images: ghcr.io/${{ github.repository }}
      - uses: docker/login-action@v1
        with:
          registry: ghcr.io
          username: ${{ github.actor }}
          password: ${{ secrets.GITHUB_TOKEN }}
      - uses: int128/kaniko-action@v1
        with:
          push: true
          tags: ${{ steps.metadata.outputs.tags }}
          labels: ${{ steps.metadata.outputs.labels }}
          cache: true
          cache-repository: ghcr.io/${{ github.repository }}/cache
Security scanning
As we all know, we should always include security scanning in to CI/CD pipelines to automate vulnerability identification. So in our next blog post we will look at how we can integrate various security scanning tools and techniques.
Stay tuned for more …